Rails5 + devise token authで作る 認証API
2017.05.20
この記事は最終更新日から1年以上が経過しています。
どもです。
ちょっとRailsの認証周りについて少々。
サーバーサイドで認証が必要な場合、大きく2つの実装方法があるかと思います。
・Cookieベースの認証
・Tokenベースの認証
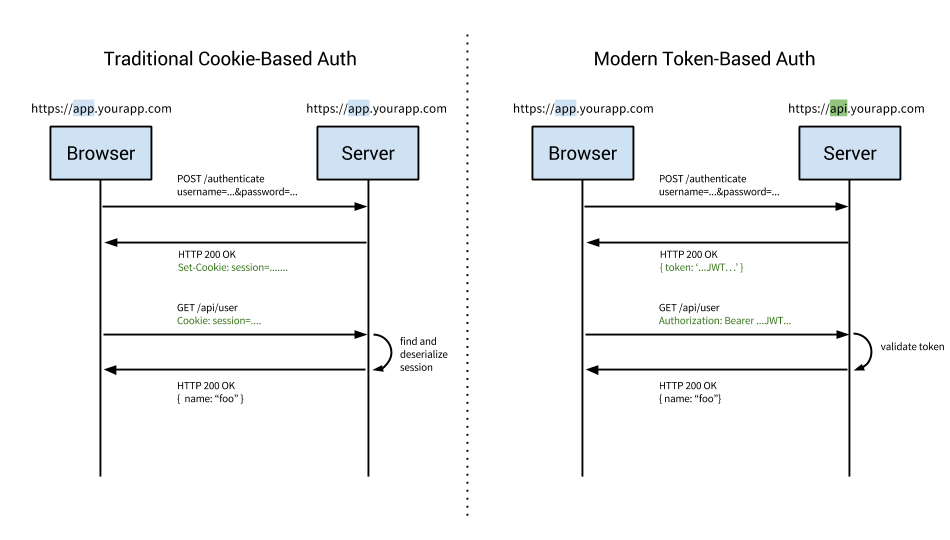
今回は、Tokenベースの認証について行っていきたいと思います。
Ruby oc Railsを基に構築し、Cookieベースの認証を行う場合、ログイン機能や、ユーザーデータ周りを Gemであるdeviseにお任せすることも多々あるかと思います。
そんな、deviseを使って、トークンベースの認証を行いたい場合「devise token auth 」というGemを使うと、何かと容易に実装が行えますので、行っていきます。
![]()
準備
それでは、早速作っていきましょう。
まず、rails new でアプリケーションを生成します。
$ rails new app_name --api -d mysql
続いて、Gemfileを編集しましょう。
新たに、「devise」と「devise_token_auth」を追加し、「jbuilder」と、「rack-cors」のコメントアウトを削除します。
Gemfile
source 'https://rubygems.org'

git_source(:github) do |repo_name|
repo_name = "#{repo_name}/#{repo_name}" unless repo_name.include?("/")
"https://github.com/#{repo_name}.git"
end

# Bundle edge Rails instead: gem 'rails', github: 'rails/rails'
gem 'rails', '~> 5.0.2'
# Use mysql as the database for Active Record
gem 'mysql2', '>= 0.3.18', '< 0.5'
# Use Puma as the app server
gem 'puma', '~> 3.0'

# jsonを扱うためのgem
# Build JSON APIs with ease. Read more: https://github.com/rails/jbuilder
gem 'jbuilder', '~> 2.5'
# Use Redis adapter to run Action Cable in production
# gem 'redis', '~> 3.0'
# Use ActiveModel has_secure_password
# gem 'bcrypt', '~> 3.1.7'

# Use Capistrano for deployment
# gem 'capistrano-rails', group: :development

# クロスドメイン対策
# Use Rack CORS for handling Cross-Origin Resource Sharing (CORS), making cross-origin AJAX possible
gem 'rack-cors'

# トークンベースの認証を行う
gem 'devise'
gem 'devise_token_auth'

group :development, :test do
# Call 'byebug' anywhere in the code to stop execution and get a debugger console
gem 'byebug', platform: :mri
end

group :development do
gem 'listen', '~> 3.0.5'
# Spring speeds up development by keeping your application running in the background. Read more: https://github.com/rails/spring
gem 'spring'
gem 'spring-watcher-listen', '~> 2.0.0'
end

# Windows does not include zoneinfo files, so bundle the tzinfo-data gem
gem 'tzinfo-data', platforms: [:mingw, :mswin, :x64_mingw, :jruby]
gemファイルの編集が終わりましたら、bundle installでgemをインストールします。
一応インストール先の pathは、「vendor/bundle」としておきます。
$ bundle install --path vendor/bundle
gemのインストールが完了しましたら、データベースの作成を行います。
$ bundle exec rake db:create
mysqlサーバーを起動していない場合は起動しておきましょう。
$ mysql.server start
ひとまず、準備は完了しましたので、続いては、「deveise token auth」を用いて データを作成していきます。
devise token auth
rails g コマンドで「deveise_token_auth」が使用できるようになっていますので、以下のコマンドで Userデータを生成します。
$ rails g devise_token_auth:install User auth
以下の様に表示すれば成功。
create  config/initializers/devise_token_auth.rb
create  db/migrate/20170520062742_devise_token_auth_create_users.rb
create  app/models/user.rb
insert  app/controllers/application_controller.rb
gsub  config/routes.rb
完了すると、マイグレーションファイルが生成されますので、そのファイルを編集していきます。
今回は、簡易版という事もあって、ユーザーが新規に登録する際、
・名前
・メールアドレス
・所属チーム
を、登録できるようにカラムの準備を行っておきます。
また、twitterやfacebookなどのソーシャルプラグインによるログインや、登録する際にメール送信して確認。などと言った機能に関して今回は行わないので、コメントアウトしておきます。
ユーザーモデルである、 user.rb を編集します。
app/models/user.rb
class User < ActiveRecord::Base
  # Include default devise modules.
  devise :database_authenticatable, :registerable,
  :recoverable, :rememberable, :trackable, :validatable
  #:confirmable, :omniauthable
  include DeviseTokenAuth::Concerns::User
end
次に、ユーザーカラム生成のマイグレーションファイルを修正します。
主な修正点として、「Confirmable」のコメントアウトと「confirmation_token」の add_indexのコメントアウト、ユーザーカラム(User Info)に「所属チーム」用のカラム 「team」の追加の記述となります。
db/migrate/xxxxxxx_devise_token_auth_create_users.rb
class DeviseTokenAuthCreateUsers < ActiveRecord::Migration[5.0]
  def change
    create_table(:users) do |t|
      ## Required
      t.string :provider, :null => false, :default => "email"
      t.string :uid, :null => false, :default => ""

      ## Database authenticatable
      t.string :encrypted_password, :null => false, :default => ""

      ## Recoverable
      t.string   :reset_password_token
      t.datetime :reset_password_sent_at

      ## Rememberable
      t.datetime :remember_created_at

      ## Trackable
      t.integer  :sign_in_count, :default => 0, :null => false
      t.datetime :current_sign_in_at
      t.datetime :last_sign_in_at
      t.string   :current_sign_in_ip
      t.string   :last_sign_in_ip

      ## Confirmable コメントアウト
      # t.string   :confirmation_token
      # t.datetime :confirmed_at
      # t.datetime :confirmation_sent_at
      # t.string   :unconfirmed_email # Only if using reconfirmable

      ## Lockable
      # t.integer  :failed_attempts, :default => 0, :null => false # Only if lock strategy is :failed_attempts
      # t.string   :unlock_token # Only if unlock strategy is :email or :both
      # t.datetime :locked_at

      ## User Info
      t.string :name
      t.string :nickname
      t.string :image
      t.string :email
      t.string :team

      ## Tokens
      t.text :tokens

      t.timestamps
    end

    add_index :users, :email,                unique: true
    add_index :users, [:uid, :provider],     unique: true
    add_index :users, :reset_password_token, unique: true

    # コメントアウト
    # add_index :users, :confirmation_token,   unique: true
    # add_index :users, :unlock_token,       unique: true
  end
end
ここまで、完了しましたら、マイグレーションコマンドを実行して、ユーザーテーブルの生成を行います。
$ bundle exec rake db:migrate
以下の様に、実行されれば成功。
== 20170520062742 DeviseTokenAuthCreateUsers: migrating =======================
-- create_table(:users)
-> 0.0164s
-- add_index(:users, :email, {:unique=>true})
-> 0.0158s
-- add_index(:users, [:uid, :provider], {:unique=>true})
-> 0.0126s
-- add_index(:users, :reset_password_token, {:unique=>true})
-> 0.0140s
== 20170520062742 DeviseTokenAuthCreateUsers: migrated (0.0590s) ==============
Routes
現在のルートの確認を行ってみましょう。
$ rake routes
Prefix Verb   URI Pattern                    Controller#Action
new_user_session GET    /auth/sign_in(.:format)        devise_token_auth/sessions#new
user_session POST   /auth/sign_in(.:format)        devise_token_auth/sessions#create
destroy_user_session DELETE /auth/sign_out(.:format)       devise_token_auth/sessions#destroy
new_user_password GET    /auth/password/new(.:format)   devise_token_auth/passwords#new
edit_user_password GET    /auth/password/edit(.:format)  devise_token_auth/passwords#edit
user_password PATCH  /auth/password(.:format)       devise_token_auth/passwords#update
PUT    /auth/password(.:format)       devise_token_auth/passwords#update
POST   /auth/password(.:format)       devise_token_auth/passwords#create
cancel_user_registration GET    /auth/cancel(.:format)         devise_token_auth/registrations#cancel
new_user_registration GET    /auth/sign_up(.:format)        devise_token_auth/registrations#new
edit_user_registration GET    /auth/edit(.:format)           devise_token_auth/registrations#edit
user_registration PATCH  /auth(.:format)                devise_token_auth/registrations#update
PUT    /auth(.:format)                devise_token_auth/registrations#update
DELETE /auth(.:format)                devise_token_auth/registrations#destroy
POST   /auth(.:format)                devise_token_auth/registrations#create
auth_validate_token GET    /auth/validate_token(.:format) devise_token_auth/token_validations#validate_token
devise_token_authのデフォルトのルート設定がされているのが確認できます。
今回は、userのteamが編集出来るように、コントローラーをオーバライドして「team」を追加していきます。
rails ジェネレータコマンドでコントローラーを生成します。
$ rails g controller auth/registrations
コントローラーが生成されましたら、編集を行っていきます。
app/controllers/auth/registrations_controller.rb
module Auth
  class RegistrationsController < DeviseTokenAuth::RegistrationsController

  private
  def sign_up_params
  params.permit(:name, :email, :team, :password, :password_confirmation)
  end

  def account_update_params
  params.permit(:name, :email, :team)
  end

  end
end
続いて、ルートを変更し、先程のコントローラーが使えるようにしていきます。
config/routes.rb
Rails.application.routes.draw do
  mount_devise_token_auth_for 'User', at: 'auth', controllers: {
    registrations: 'auth/registrations'
  }
  # For details on the DSL available within this file, see http://guides.rubyonrails.org/routing.html
end
rake routes コマンドで、先程のauth/registrationsにパスが作成されていたら成功です。
$ rake routes
Prefix Verb   URI Pattern                    Controller#Action
new_user_session GET    /auth/sign_in(.:format)        devise_token_auth/sessions#new
user_session POST   /auth/sign_in(.:format)        devise_token_auth/sessions#create
destroy_user_session DELETE /auth/sign_out(.:format)       devise_token_auth/sessions#destroy
new_user_password GET    /auth/password/new(.:format)   devise_token_auth/passwords#new
edit_user_password GET    /auth/password/edit(.:format)  devise_token_auth/passwords#edit
user_password PATCH  /auth/password(.:format)       devise_token_auth/passwords#update
PUT    /auth/password(.:format)       devise_token_auth/passwords#update
POST   /auth/password(.:format)       devise_token_auth/passwords#create
cancel_user_registration GET    /auth/cancel(.:format)         auth/registrations#cancel
new_user_registration GET    /auth/sign_up(.:format)        auth/registrations#new
edit_user_registration GET    /auth/edit(.:format)           auth/registrations#edit
user_registration PATCH  /auth(.:format)                auth/registrations#update
PUT    /auth(.:format)                auth/registrations#update
DELETE /auth(.:format)                auth/registrations#destroy
POST   /auth(.:format)                auth/registrations#create
auth_validate_token GET    /auth/validate_token(.:format) devise_token_auth/token_validations#validate_token
auth/registrations に、「#new」、「#update」などのアクションが付与されているのを確認。
ここまでで一旦、設定は完了です。お疲れ様でした!
initialize
毎回、毎回、トークンが変更されるのはちょっと面倒なので、以下の様に設定しておきます。
config.change_headers_on_each_request を true にしていると、リクエストごとに token を新しくする必要がある。 という設定になるので、コメントアウトを解除し「false」に変更します。
# config.change_headers_on_each_request = true
↓
config.change_headers_on_each_request = false
# config.token_lifespan = 2.weeks
↓
config.token_lifespan = 1.month
その他、config.headers_namesのコメントアウトを解除。
config/initializers/devise_token_auth.rb
DeviseTokenAuth.setup do |config|
# By default the authorization headers will change after each request. The
# client is responsible for keeping track of the changing tokens. Change
# this to false to prevent the Authorization header from changing after
# each request.
config.change_headers_on_each_request = false

# By default, users will need to re-authenticate after 2 weeks. This setting
# determines how long tokens will remain valid after they are issued.
config.token_lifespan = 1.month

# Sets the max number of concurrent devices per user, which is 10 by default.
# After this limit is reached, the oldest tokens will be removed.
# config.max_number_of_devices = 10

# Sometimes it's necessary to make several requests to the API at the same
# time. In this case, each request in the batch will need to share the same
# auth token. This setting determines how far apart the requests can be while
# still using the same auth token.
# config.batch_request_buffer_throttle = 5.seconds

# This route will be the prefix for all oauth2 redirect callbacks. For
# example, using the default '/omniauth', the github oauth2 provider will
# redirect successful authentications to '/omniauth/github/callback'
# config.omniauth_prefix = "/omniauth"

# By default sending current password is not needed for the password update.
# Uncomment to enforce current_password param to be checked before all
# attribute updates. Set it to :password if you want it to be checked only if
# password is updated.
# config.check_current_password_before_update = :attributes

# By default we will use callbacks for single omniauth.
# It depends on fields like email, provider and uid.
# config.default_callbacks = true

# Makes it possible to change the headers names
config.headers_names = {:'access-token' => 'access-token',
                        :'client' => 'client',
                        :'expiry' => 'expiry',
                        :'uid' => 'uid',
                        :'token-type' => 'token-type' }

# By default, only Bearer Token authentication is implemented out of the box.
# If, however, you wish to integrate with legacy Devise authentication, you can
# do so by enabling this flag. NOTE: This feature is highly experimental!
# config.enable_standard_devise_support = false
end
Restlet Client – REST API Testing
REST APIをテストするのに「Restlet Client – REST API Testing」をインストールして試していきます。
chromeの拡張機能として提供されているパッケージとなります。
Restlet Client – REST API Testing
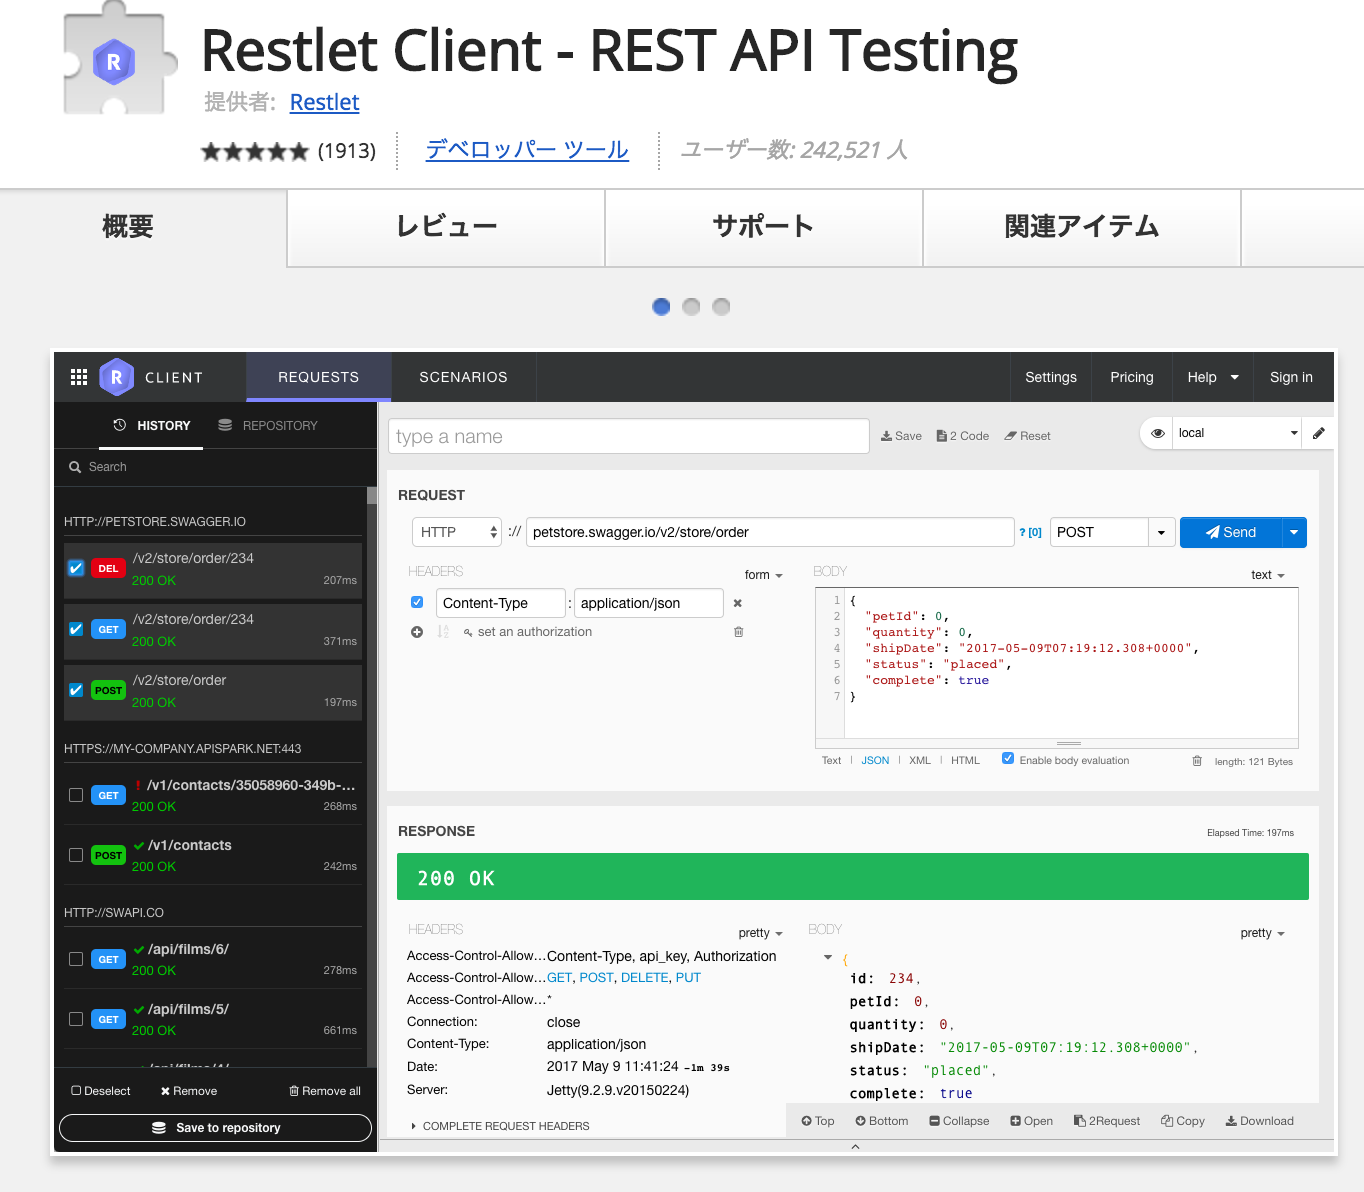
APIテスト
「Restlet Client – REST API Testing」をインストールしたら早速試していきましょう。
Rails s コマンドでRailsサーバーを起動します。
$ rails s
ユーザー登録
ユーザー登録は「localhost:3000/auth」のpostで作成されます。
sendデータ 例:
{
  "name": "daisuke.takayama",
  "email": "webcyou@example.com",
  "password": "password",
  "team": "ウェブ帳"
}
レスポンス
{
  "status": "success",
  "data":{
    "id": 1,
    "email": "webcyou@example.com",
    "provider": "email",
    "uid": "webcyou@example.com",
    "name": "daisuke.takayama",
    "nickname": null,
    "image": null,
    "team": "ウェブ帳",
    "created_at": "2017-05-20T07:41:15.000Z",
    "updated_at": "2017-05-20T07:41:16.000Z"
  }
}
成功すると、上記の様にレスポンスが返ってくるかと思います。
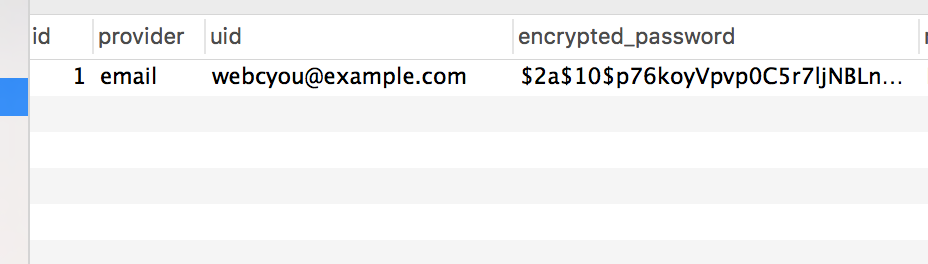
DBの方を確認すると、usersテーブルにユーザーデータが作成されているのが確認できます。
続いて、ログインしてみましょう。
ログイン
ログインは「localhost:3000/auth/sign_in」にPOSTでログインとなります。
sendデータ 例:
{
  "email": "webcyou@example.com",
  "password": "password"
}
レスポンス
{
  "data":{
    "id": 1,
    "email": "webcyou@example.com",
    "provider": "email",
    "uid": "webcyou@example.com",
    "name": "daisuke.takayama",
    "nickname": null,
    "image": null,
    "team": "ウェブ帳"
  }
}
パスワードの変更
続いて、パスワードの変更。
パスワードの変更は、 「localhost:3000/auth/password」 に PUT リクエストとなります。
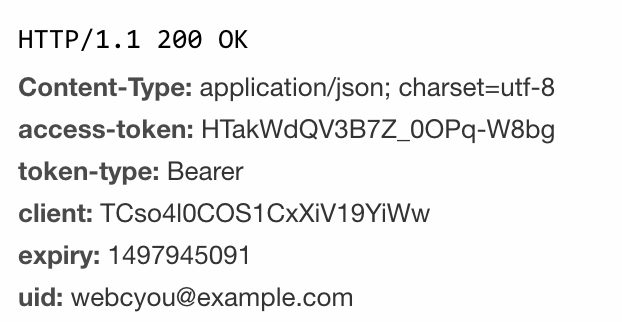
いよいよなんですが、ユーザー情報や、パスワードの変更などを行う際、 認証情報が必要となってきます。
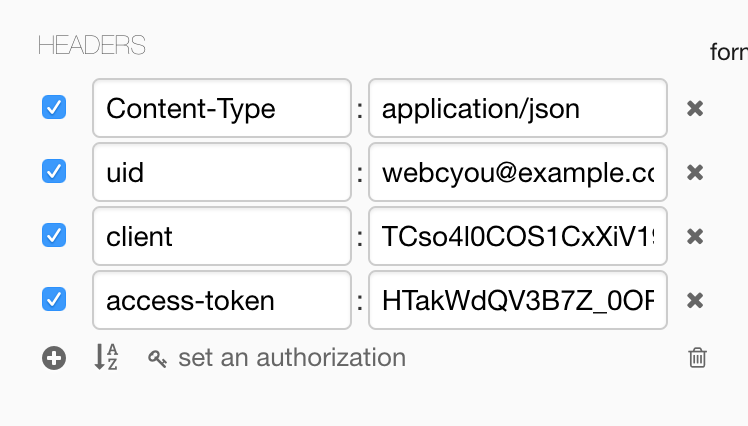
その為に必要なのは、以下の通りとなっております。
REQUEST HEADERSの
・ access-token
・ client
・ uid
の、3つとなります。
先程、ログインした際に、HEADERSに付与されている情報が必要となってきますので、そちらを利用していきます。
「Restlet Client – REST API Testing」では、以下の画像の様に、REQUESTの部分で設定できますので、コピペを行って入力しましょう。
入力したら、パスワード変更のデータを PUTしてみましょう。
sendデータ 例:
{
  "password": "password2",
  "password_confirmation": "password2"
}
レスポンス
{
  "success": true,
  "data":{
    "id": 1,
    "provider": "email",
    "email": "webcyou@example.com",
    "uid": "webcyou@example.com",
    "name": "daisuke.takayama",
    "nickname": null,
    "image": null,
    "team": "ウェブ帳",
    "created_at": "2017-05-20T07:41:15.000Z",
    "updated_at": "2017-05-20T08:11:19.000Z"
  },
  "message": "Your password has been successfully updated."
}
パスワード変更が出来ました。
ユーザー情報の変更
最後に、ユーザー情報の変更をおこなっていきます。
ユーザー情報の変更は、 「localhost:3000/auth/」 に PUT リクエストとなります。
先程の
・ access-token
・ client
・ uid
の情報を「REQUEST HEADERS」に付与し、 「localhost:3000/auth/」 に PUT リクエストを送ります。
sendデータ 例:
{
  "team": "webcyou"
}
レスポンス
{
"status": "success",
  "data":{
    "id": 1,
    "team": "webcyou",
    "email": "webcyou@example.com",
    "provider": "email",
    "uid": "webcyou@example.com",
    "name": "daisuke.takayama",
    "nickname": null,
    "image": null,
    "created_at": "2017-05-20T07:41:15.000Z",
    "updated_at": "2017-05-20T08:16:48.000Z"
  }
}
所属する「チーム」の変更を行ってみました。
レスポンスデータで変更に成功したのが確認できました。
と、
今回、ザッとではありましたが、Tokenベースの認証を容易に実装できる Gem 「devise token auth」のご紹介でした。
今回のソースに関しては、githubの方にも追加しております。
github – devise_token_auth_demo
こちらを使って、Tokenベースの認証に切り替え、SPAサイトなど作ってみると良いかもしれませんね。
ではではぁ。