Webassembly用いて、SDL 2.0をブラウザでレンダリング
2020.08.10
この記事は最終更新日から1年以上が経過しています。
どもです。
お仕事で、ちょいとWebassembly扱う機会(前の話になりますが。。)ありましたのでメモ程度にと。
もろもろ調べていましたら、SDL 2.0もレンダリングできるとの事でしたので、早速テスト。
環境
macOS Mojave 10.14.5
Python 3.7.0
nodejs 12.18.1
Emscripten インストール
先ずは、ともあれ、Emscripten(エムスクリプトン)コンパイラが必要となって来ますので、インストールをして行きましょう。
Emscriptenとはなんぞやですが、Emscriptenは、C++ から生成される LLVM ビットコードを入力に、ウェブブラウザや Node.js などで動作する JavaScript を出力するコンパイラとなっております。
公式サイトとGitHubレポジトリは以下の通り。
Emscripten
GitHub
https://github.com/emscripten-core/emscripten
こちらのダウンロード(インストール)方法に沿って実行していきます。
こちらのページより、各環境に沿ったインストール方法が記載されております。
https://emscripten.org/docs/getting_started/downloads.html
$ git clone https://github.com/emscripten-core/emsdk.git
$ cd emsdk
公式ドキュメントより
git pull

# Download and install the latest SDK tools.
./emsdk install latest

# Make the "latest" SDK "active" for the current user. (writes .emscripten file)
./emsdk activate latest

# Activate PATH and other environment variables in the current terminal
source ./emsdk_env.sh
と、会社のPCでは何も問題なかったのですが、自宅Macだと、
<urlopen error [SSL: CERTIFICATE_VERIFY_FAILED] certificate verify failed (_ssl.c:749)>
と、
SSL: CERTIFICATE_VERIFY_FAILEDのエラーが吐かれてしまった。。
何か足りないのか。必須となりそうな所は公式サイトでは、以下の通り。
Node.js (0.8 or above; 0.10.17 or above to run websocket-using servers in node):
Python 2.7.12 or above, or Python 3.5 or above (Python 2.7.0 or newer may also work, but is known to have SSL related issues, https://github.com/emscripten-core/emscripten/issues/6275)
Java (1.6.0_31 or later). Java is optional. It is required to use the Closure Compiler (in order to minify your code).
Git client. Git is required if building tools from source.
LLVM (LLVM, including clang and wasm-ld)
Binaryen (Binaryen, including wasm-opt, wasm-emscripten-finalize, etc.)
The Emscripten code, from GitHub
こちらから確認できます。
エラーから見てみると、どうもpyhonの証明書のパスが通っていないぽい。。
pyenvを利用しているからかも。
どうやら、certifiパッケージあれば良いみたいなので、pipコマンドでインストール。
$ pip install --upgrade certifi
(デフォルトをpip3にしている)
インストール完了後、pythonインタプリタ実行。
$ python
>>> import certifi
>>> certifi.where()
上記のコマンドで、 certifi/cacert.pem のパスが表示します。
以下のコマンドでパスを通します。
$ export SSL_CERT_FILE=表示されたcertifi/cacert.pemパス
再び、Emscriptenのインストールを行う。
$ ./emsdk install latest
インストール後アクティベートコマンド実行。
$ ./emsdk activate latest
すると、以下のようなメッセージが表示しますので、
Setting the following tools as active:
node-12.18.1-64bit
python-3.7.4-64bit

Next steps:
- To conveniently access emsdk tools from the command line,
consider adding the following directories to your PATH:
....
以下のコマンドで、シェルを適応。
$ source ./emsdk_env.sh
すると、PATHとenvironmentが設定されます。
(…..は、各環境で異なります。)
Adding directories to PATH:
PATH += ...../emsdk
PATH += ...../emsdk/upstream/emscripten
PATH += ...../emsdk/node/12.18.1_64bit/bin
PATH += ...../emsdk/python/3.7.4_64bit/bin

Setting environment variables:
EMSDK = ...../emsdk
EM_CONFIG = ...../emsdk/.emscripten
EM_CACHE = ...../emsdk/upstream/emscripten/cache
EMSDK_NODE = ...../emsdk/node/12.18.1_64bit/bin/node
EMSDK_PYTHON = ...../emsdk/python/3.7.4_64bit/bin/python3
と、いう事で無事Emscriptenをインストール出来ました。
ここまで行って、後から気が付いたのですが、Macであれば homebrewで一発でインストール出来るっぽいです。。。(試していないです。)
$ brew install emscripten binaryen
SDL Canvas Wasm
それでは、SDL2.0を、wasm形式に出力し、ブラウザにレンダリングして行きましょう。
という事で、手っ取り早く試せるデモがこちらのレポジトリにありましたので試して行きます。
https://github.com/timhutton/sdl-canvas-wasm
こちらのレポジトリに書かれた手順で行って行きます。
Install Emscripten: http://emscripten.org

Clone this repo:git clone https://github.com/timhutton/sdl-canvas-wasm.gitcd sdl-canvas-wasm

Build index.js and index.wasm:emcc core.cpp -s WASM=1 -s USE_SDL=2 -O3 -o index.js

Open index.html in a web browser. You should see a moving blue square in a red square:

Chrome doesn't support file:// XHR requests, so you need to first start a webserver, e.g.:

with Python 2: python -m SimpleHTTPServer 8080

with Python 3: python -m http.server 8080

and then open this URL:

http://localhost:8080/
Emscripten コンパイラで、OpenGLやらSDLが、wasm形式ファイルとjsファイルとして出力されているのが確認できます。
HTMLのJS読み込み箇所は以下の通り。
グローバルオブジェクトの「Module」を使ってレンダリングするDOMを指定すれば良いみたいです。
<!-- Create the canvas that the C++ code will draw into -->
<canvas id="canvas" oncontextmenu="event.preventDefault()"></canvas>

<!-- Allow the C++ to access the canvas element -->
<script type='text/javascript'>
    var Module = {
        canvas: (function() { return document.getElementById('canvas'); })()
    };
</script>

<!-- Add the javascript glue code (index.js) as generated by Emscripten -->
<script src="index.js"></script>
SDLをインクルードしているC++ファイルを見てみると、
SDL 2.0 window使用ではなく、Emscripten loopを使う形ぽいで、そのままSDL 2.0のソースを利用できるってことではなく、
ちょっと置き換えが必要ぽい感じですね。
emscripten_set_main_loop_arg(mainloop, &ctx, fps, simulate_infinite_loop);
https://github.com/timhutton/sdl-canvas-wasm/blob/main/core.cpp#L49
Emscripten コマンド
先ほど、Emscriptenコマンドの emcc を用いてwasmのコンパイルを行ったのですが、コマンドのオプションも色々と用意されており、
オプションのよってビルド結果も異なって来ます。
#include <stdio.h>

int main(int argc, char ** argv) {
    printf("Hello World\n");
}
Emscriptenコマンド実行
$ emcc hello.c -s WASM=1 -o hello.html
上記のオプションは次のとおりです。
-s WASM=1 — 出力を wasm に指定。指定しない場合、Emscripten はデフォルトでは asm.js として出力されます。
-o hello.html — コードを実行するための HTML ページを指定。wasm モジュールとウェブ環境で使用できるようにコンパイル、インスタンス化するための JavaScriptコードも出力に含まれます。
上記のコマンドを行って、出力されるファイルは、以下の通りになります。
バイナリの wasm モジュールコード (hello.wasm)
ネイティブの C の関数と JavaScript/wasm の間で変換を行う JavaScript ファイル (hello.js)
wasm コードをロード、コンパイル、インスタンス化し、ブラウザに出力するための HTML ファイル (hello.html)
最後に
Webassemblyの特徴の一つとして、AOTコンパイラによる実行パフォーマンスの効率化が挙げられるでしょう。
JITコンパイラ(Just-in-Timeコンパイラ=実行時コンパイラ)ではなく、AOTコンパイラ(Ahead-of-Timeコンパイラ=事前コンパイラ)であり、これにより大幅なシンプル化とネイティブコード実行時のオーバーヘッドを実現できたとしています。
また、気を付けないといけない点は、Emscriptenでコンパイルする対象のCなどのソース側にはDOMを扱うAPIがないので、DOMのイベントなどを扱う場合はHTML5側でUIを作成し、DOMイベントを制御し、Cなどのソース側にイベントを送る必要があります。
図で書くと以下の通り。
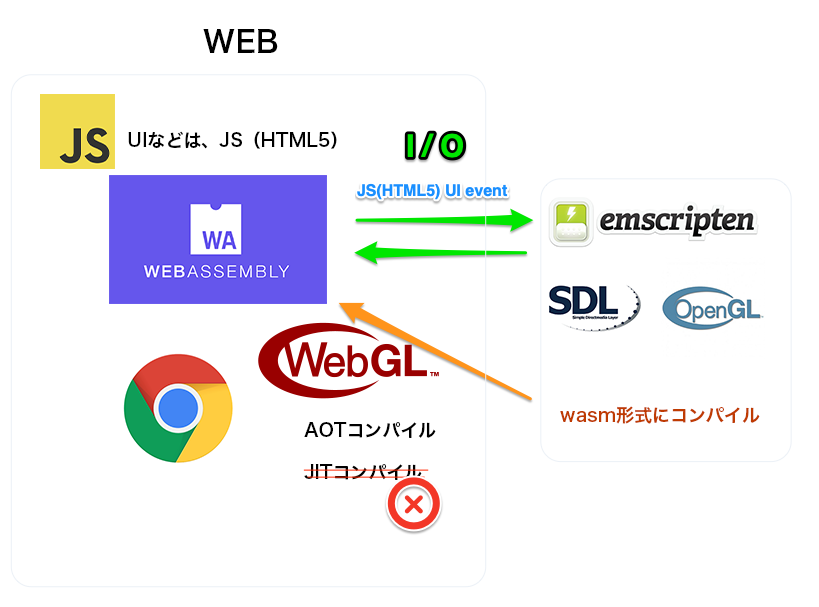
つまり、処理とレンダリングは行えるけど、DOMAPIなど存在しないので UIはHTMLで作成となります。
Web側から、C/C++側の関数を直接呼び出すときは、Moduleのccall関数を使って呼び出す形となります。
以下のように、
Module.ccall('myFunction', // 関数名
'', // 戻り値の型
['string'], // 引数の型名の配列
['テスト']); // 引数の配列
C/C++側
int myFunction() {
    何かしらの処理
}
という風に呼び出すので、web側のDOMイベントにバインドさせ実行する形になるでしょう。
といった様に今回は、触りだけではありますが、Webassembly関連のお話でした。
今後もっと触っていければと思います。
ではではぁ。
