Macで、Qt5 開発 QPushButton、QSliderなどウィジェット作成
2020.12.13
この記事は最終更新日から1年以上が経過しています。

どもです。今回もまたまたQtを扱っていこうかなと、言う事で、
だいぶん前から積み本となっているこちらの書籍を参考に、ウィジェットを作成していきたいと思います。

ですが、こちらの書籍見て分かるように、「Qt4」に書かれた書籍でして、初版発売は2007年と実に13年前の書籍と言うこともあって、現状のバージョンQt5で動かそうとしても、そのままでは動かなかったりしますので、手を加えながら作成していきたいと思います。
開発環境
- Mac OS 10.14.5
- Homebrew 2.6.0
- Apple clang version 11.0.0
- Qt 5.15.2
QPushButtonの表示
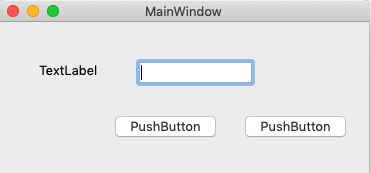
まずは、以下の様にボタンの表示から。
QPushButtonを用いて表示させます。

main.cpp
#include <QtWidgets/QApplication>
#include <QPushButton>
int main(int argc, char *argv[]) {
QApplication app(argc, argv);
QPushButton *button = new QPushButton("Quit");
QObject::connect(button, SIGNAL(clicked()), &app, SLOT(quit()));
button->show();
return app.exec();
}
シンプルにmain.cppの1ファイルのみのプログラムです。
作成したら、以下のコマンドでビルド。
$ qmake -project
$ qmake ●●●●●.pro
$ make
「pushbutton」の名前でディレクトリを作成していた場合、以下の様に起動ファイルが生成されるので実行。
$ ./pushbutton.app/Contents/MacOS/pushbutton
SIGNAL(シグナル)とSLOT(スロット)
ここで抑えるべき所は「シグナルとスロット」ですかね。
Qtのウィジェットでは、ユーザーが操作を行ったり、状態が変化すると「シグナル」を送信する様に設計されている様です。
上記では、clicked()と言うシグナルを送信します。
「シグナル」は「スロット」に結び付けられることができ、上記では「シグナル」に対して、「スロット」のquit()関数に結びついているので、ボタンをクリックすることによって、ウィジェットを閉じる事ができます。
前回の記事のMacで、Qt5をbrew installしてサクッと起動する。でも書いたのですが、Qt5では、QApplicationは以下の include記述で、
#include <QtWidgets/QApplication>
〇〇〇.proファイルの末尾に以下の追記が必要です。
QT+=widgets
QSliderなど含んだウィジェットのレイアウト
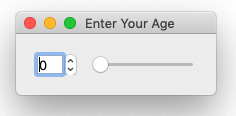
続いては、spinとsliderが連動しているウィジェットです。
main.cpp
#include <QtWidgets/QApplication>
#include <QHBoxLayout>
#include <QSlider>
#include <QSpinBox>

int main(int argc, char *argv[]) {
    QApplication app(argc, argv);

    QWidget *window = new QWidget;
    window->setWindowTitle("Enter Your Age");

    QSpinBox *spinBox = new QSpinBox;
    QSlider *slider = new QSlider(Qt::Horizontal);
    spinBox->setRange(0, 130);
    slider->setRange(0, 130);

    QObject::connect(spinBox, SIGNAL(valueChanged(int)), slider, SLOT(setValue(int)));
    QObject::connect(slider, SIGNAL(valueChanged(int)), spinBox, SLOT(setValue(int)));

    QHBoxLayout *layout = new QHBoxLayout;
    layout->addWidget(spinBox);
    layout->addWidget(slider);
    window->setLayout(layout);

    window->show();
    return app.exec();
}
ここでの注目しておく所は、 まず、QSpinBoxとQSliderのオブジェクトを生成し、それぞれsetRange関数を用いて、0〜130まで値を扱える様に設定しています。
その後、QObject::connectを用いてspinBoxとsliderを連動する様に設定しています。
spinBoxの値が変更されれば、sliderの方にも値がセットされ、sliderの値が変更されれば、sliderの方にも値がセットされます。
お互いのシグナルに対してスロットで受け取り、setValue関数で代入されています。
そうすることによって、連動させる事が可能となっております。
また、最後、QHBoxLayoutで横並びのレイアウトを実装しているのですが、QLayoutは以下の様なレイアウトマネージャが用意されています。
- QHBoxLayout: ウィジェットを左から右に配置。
- QVBoxLayout: ウィジェットを上から下に配置。
- QGridLayout: ウィジェットを格子状に配置。
検索フォームなど含んだウィジェット
と言う事で、最後のウィジェットは、以下の様な検索フォームを想定したウィジェットです。
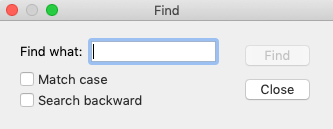
今まで、「main.cpp」ファイルのみで生成して来たのですが、ここでは他にも流用できる様に独立したコンポーネントとして作成していく形となります。
なので、「finddialog.h」「finddialog.cpp」に、ウィジェットのクラスを作成していきます。
finddialog.h
#ifndef FINDDIALOG_H
#define FINDDIALOG_H

#include <QtWidgets/QDialog>

class QCheckBox;
class QLabel;
class QLineEdit;
class QPushButton;

class FindDialog : public QDialog
{
    Q_OBJECT

    public:
        FindDialog(QWidget *parent = 0);

    signals:
        void findNext(const QString &str, Qt::CaseSensitivity cs);
        void findPrevious(const QString &str, Qt::CaseSensitivity cs);

    private slots:
        void findClicked();
        void enableFindButton(const QString &text);

    private:
        QLabel *label;
        QLineEdit *lineEdit;
        QCheckBox *caseCheckBox;
        QCheckBox *backwardCheckBox;
        QPushButton *findButton;
        QPushButton *closeButton;
};

#endif
#ifndef FINDDIALOG_H、#define FINDDIALOG_H で、複数回のインクルードを防いでます。
FindDialogクラスを作成。signalsで2つのシグナルを宣言。Searchbackwardオプションありで、findPreviousシグナル、そうでなければfindNextシグナル送信する設定です。
private箇所に、2つのスロットを宣言。スロット実装の際にダイアログの子ウィジェットの多くアクセスする為、ウィジェットのポインタも宣言しています。
続いて、「finddialog.cpp」ファイルで実装。
finddialog.cpp
#include <QtGui>
#include <QtWidgets>

#include "finddialog.h"

FindDialog::FindDialog(QWidget *parent): QDialog(parent)
{
    label = new QLabel(tr("Find &what:"));
    lineEdit = new QLineEdit;
    label->setBuddy(lineEdit);

    caseCheckBox = new QCheckBox(tr("Match &case"));
    backwardCheckBox = new QCheckBox(tr("Search &backward"));

    findButton = new QPushButton(tr("&Find"));
    findButton->setDefault(true);
    findButton->setEnabled(false);

    closeButton = new QPushButton(tr("Close"));

    connect(lineEdit, SIGNAL(textChanged(const QString &)), this, SLOT(enableFindButton(const QString &)));
    connect(findButton, SIGNAL(clicked()), this, SLOT(findClicked()));
    connect(closeButton, SIGNAL(clicked()), this, SLOT(close()));

    QHBoxLayout *topLeftLayout = new QHBoxLayout;
    topLeftLayout->addWidget(label);
    topLeftLayout->addWidget(lineEdit);

    QVBoxLayout *leftLayout = new QVBoxLayout;
    leftLayout->addLayout(topLeftLayout);
    leftLayout->addWidget(caseCheckBox);
    leftLayout->addWidget(backwardCheckBox);

    QVBoxLayout *rightLayout = new QVBoxLayout;
    rightLayout->addWidget(findButton);
    rightLayout->addWidget(closeButton);
    rightLayout->addStretch();

    QHBoxLayout *mainLayout = new QHBoxLayout;
    mainLayout->addLayout(leftLayout);
    mainLayout->addLayout(rightLayout);
    setLayout(mainLayout);

    setWindowTitle(tr("Find"));
    setFixedHeight(sizeHint().height());
}

void FindDialog::findClicked()
{
    QString text = lineEdit->text();
    Qt::CaseSensitivity cs = caseCheckBox->isChecked() ? Qt::CaseSensitive : Qt::CaseInsensitive;

    if (backwardCheckBox->isChecked()) {
        emit findPrevious(text, cs);
    } else {
        emit findNext(text, cs);
    }
}

void FindDialog::enableFindButton(const QString &text) {
    findButton->setEnabled(!text.isEmpty());
}
trメソッドは、文字列を他の言語用に翻訳する為にマーキングしています。
connect箇所を見ていくと、テキストボックスの内容が変更される度にプライベートなenableFindButtonスロットを呼び出し、ボタンのenabele、disableを監視している形です。
同様に、findButtonを押下で、findClicked()呼び出し、closeButtonを押下でclose()呼び出し終了しています。
FindDialogはQObjectの子孫クラスという事で、connectメソッドの前にQObject::を付ける必要がない。
QHBoxLayout〜からは、QHBoxLayoutやQVBoxLayoutなどのレイアウトマネージャを用いてウィジェットをレイアウト。
findClicked()メソッドは、Search backwardオプションありで、findPrevious()シグナル、そうでなければfindNext()を送信させる処理。
enableFindButton()メソッドは、テキストボックスの内容有り無しで、enabele、disableを変更。
「main.cpp」で、上記のFindDialogウィジェットを呼び出します。
main.cpp
#include <QtWidgets/QApplication>

#include "finddialog.h"

int main(int argc, char *argv[]) {
    QApplication app(argc, argv);
    FindDialog *dialog = new FindDialog;
    dialog->show();
    return app.exec();
}
という事で、Qtのウィジェットを作成してみました。
次は、QtCreatorを扱っていきたいと思います。